The Bunnings Workshop community can help with your home improvement projects.
- Bunnings Workshop
- >
- Featured Projects
- >
- Outdoor seating with planter and storage
Outdoor seating with planter and storage
Share
- Subscribe to RSS Feed
- Mark as New
- Mark as Read
- Bookmark
- Subscribe
- Printer Friendly Page
- Report Inappropriate Content
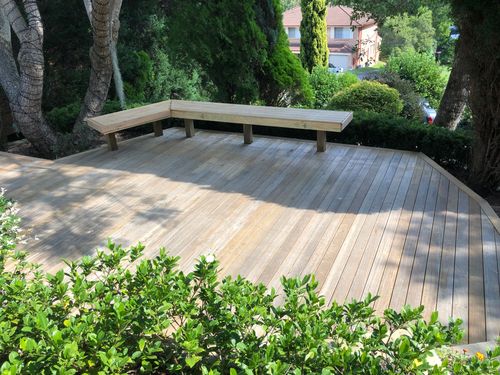
An outdoor entertainment area with seating, planter boxes and storage built using Pine sleepers, fibre sheet cladding, acrylic render and solar strip lighting.

The project
This is my first time sharing a project, but I thought it would be worth sharing my experience. We decided to undertake my biggest project so far - an outdoor rendered bench seat with a planter and storage. We had a pretty bare and under-utilised concreted area in our backyard and thought this would be a perfect additional to be used in summer and possibly in the cooler months with the addition of a firepit or heaters.
Steps
Step 1
The first step was clearing the area and cutting down all the sleepers to size, and then building the frame of the seat from the ground up. The seat measures 3m on the outer side and around 2.5m on the inside where the seat is. The offcuts were used to fill in the smaller ends of the whole bench.
Step 2
Once I had put together two rows of sleepers, it was time to add in the supports for the seat itself. I can't recall at what intervals I placed these, but they were all spaced relatively evenly along the way. These pieces would go right through to the other side and be bolted down and I suppose be "cantilevered" so the seat appears to be floating.


Step 3
The next row of sleepers required me to notch out the space for the horizontal sleeper that was just added for the seat support to add the next row. This was probably the most time consuming part as I didn't have a decent enough jigsaw, but once I borrowed a Bosch jigsaw, I was able to get through it much quicker.
Step 4
The completed frame of the seat was four sleepers high, or 800mm. At this point, I made my final adjustments to the level overall and allowed for a bit of fall so any rain water would run off towards the stormwater drain nearby.


I had some spare timber, so we decided to add some extra support to the seat.

Step 5
It was now time to clad the seat in the fibre cement. I didn't feel comfortable cutting the sheets with my track saw due to all the dust, so I opted to score and snap the sheets. This was a lot easier than I was expecting it to be. It may have taken longer but I wasn't to set back by it.

Step 6
Once the frame was completely cladded, I added some angles to the external corners and some fibre cement jointing tape to any joins and internal corners (sorry, I didn't grab any pictures). Once this was done, it was time to add the render. I opted for the Dunlop pre-mixed render, mainly because I had never rendered before and I was planning on completing the render in the evenings and I didn't want to annoy any neighbours using my drill to mix the render up at that time. Another reason was it was already in the white we wanted, so there was no need to paint.

Step 7
Once the majority of the seat was rendered, I added the lid for the storage section and gave that a render also.

Step 8
Finally, we had some soil delivered and filled up the planter section of the seat and planted three dwarf olive trees to finish off the Mediterranean look. I also decided to add some strip lighting under the seat to add to the ambience.

Step 9
And that was it. It's a little rough around the edges with the render but overall I couldn't be happier. It has elevated the area and created a great spot for lounging and entertaining.
Our future plans would be to add a pergola over the top and create a sort of cabana feel. I hope this inspires someone to do the same.


I think the biggest takeaway from this project and the key difference to some smaller ones I have done is I made sure to plan it out in detail using SketchUp (a free sort of CAD software online). This allowed me to not only visualise everything and plan out materials but also troubleshoot before starting anything.
This no doubt saved me heaps of time and kept the overall expense down. I’m sure everyone knows the importance of planning but it was something I definitely learnt how important it was as a newbie.

Tools and materials
Materials used in the project:
- 16 x 3m x 200mm x 50mm treated Pine sleepers
- 4 x 2.4m x 200mm x 50mm treated Pine sleepers
- 2 x 3m x 1.2m Fibre cement sheet cladding
- 3 x 2.4m x 1.2m fibre cement sheet cladding
- 1 x 1.8m Piano hinge
- Fibro screws
- Fibre cement jointing tape
- 14G x 125mm bugle screws
- 3 Olea Europea Bambalina (dwarf olive trees)
- Solar powered LED strip lighting
- 2 x buckets Dunlop pre-mix acrylic render (White)
- Soil.
Tools used in the project:
More inspiration for your backyard makeover
Workshop member Nidge transformed their backyard with planter boxes and seating made from timber.

Community member SmileDesigner carried out a comprehensive backyard makeover with raised beds and seating.

Check out our Top 10 most popular planter box projects, Top 10 most popular garden makeovers, Top 10 most popular outdoor furniture projects and Top 10 most popular outdoor bench projects for more ideas from our Bunnings Workshop community.
- Mark as Read
- Mark as New
- Bookmark
- Highlight
- Report Inappropriate Content
Good Evening @AriG
Wow! That ghas come up so nice and looks incredibly solid! I wanst sure at first but as I followed you through the build I was nodding to myself and going ahhh get it now.
Really nicely executed project, love the detail of the pics 
Dave
- Mark as Read
- Mark as New
- Bookmark
- Highlight
- Report Inappropriate Content
This looks absolutely fantastic. Well done @AriG.
- Mark as Read
- Mark as New
- Bookmark
- Highlight
- Report Inappropriate Content
Thank you for sharing! This looks amazing and it has provided me with inspiration to create one myself!
Why join the Bunnings Workshop community?
Workshop is a friendly place to learn, get ideas and find inspiration for your home improvement projects