The Bunnings Workshop community can help with your home improvement projects.
- Bunnings Workshop
- >
- Featured Projects
- >
- Outdoor picnic table using recycled timb...
Outdoor picnic table using recycled timber
Share
- Subscribe to RSS Feed
- Mark as New
- Mark as Read
- Bookmark
- Subscribe
- Printer Friendly Page
- Report Inappropriate Content
Recycled Merbau timber used to build an outdoor table with bench seats.

The project
For the past three or four years I have wanted an outside table next to the driveway. I had collected timber planks from work years ago and have used them for ramps over the years, knowing one day they would become a table. I had also collected old timber that was being thrown out and that sat in a pile for a few years.
I get spectacular sunsets over the escarpment, so I thought it would be a perfect spot for the table to sit. One thing I do needed to do is to level the ground underneath the table. Soil from various projects had spilled onto the lawn and merged with it. I thought I had done a reasonable job scraping it back to level but I hadn't.
Steps
Step 1
I had never built a freestanding table from scratch. I was super worried about it being high enough to be comfortable and easy enough to sit with your legs underneath it. I was also worried about getting everything right and being solid enough to sit at.
As the old boards I had picked up had been used for concreting, I was reluctant to plane them as I figured there could be dirt/concrete/rock embedded in the timber. That would chew the planer's blade like crazy. It felt smooth to touch, so I decided to oil it instead.

Working out how to put the table together with what I had.

The timber planks had a tongue and groove to them.

Even though they have a bit of a twist, some went together easily enough. Others had a bit of a gap.

Tapping the timber boards together with the mallet really helped.

Working out the supports across the underside of the table. I decided to use coach bolts down through the top and through the long side of the 50 x 100mm timber.

Having never made legs for a table before, I was using test pieces to get the angles right.

The height I was thinking of was 790mm from the floor to top of the table. It ended up being 790mm.

Step 2
I had worked out the angle to cut was 45 degrees and I had it worked out how to cut both ends of the legs.

I was surprised at how it worked out. So I cut the other end of the legs.

Unfortunately, I messed up. I thought I had figured it out but somehow I cut the legs the wrong way. It was an easy fix as these were only "test" pieces. Here's my measuring stick to make sure all the legs were at the same height.

Step 3
The test legs worked out. Now to cut the true legs.

This is the base plate. I decided to give each end an angled cut to stop knees from banging against them so easily.

And, of course, the angled cut comes back to haunt me. Trying to clamp on the end of the timber plus drill down was problematic after I cut that tiny bit. Luckily, I had this old school clamp that was low profile. It worked a treat.

The depth that the F clamp can go in is limited to the distance between the orange plastic foot and the silver metal edge of the bracket.

Step 4
First half done. This table is going to be heavy.

This shows the spacing block at the cross point.

Step 5
The second set of legs, 450mm in from the edge.

Using my test pieces as templates. It made life a lot easier.

Both done. I was cheering.

750mm to the underside of the table, 790mm to the top.

Shifting it was an interesting exercise. I don't know the overall weight but it took three adults to lift and move it, and four to lift it onto a trailer.

Once I placed it on the ground, it really showed up how uneven the ground was.

Step 6
I also did not want to rest the timber feet directly on the ground, so I placed some pavers down first.
Levelling the pavers.

Step 7
The bench seats being worked out. 450mm in from the first edge of the foot.

Step 8
Working out the height that feels right with sitting/knees/feet I used the saw horses as test subjects. They are perfect, so 500mm height from floor to top of the seat.

Back to working out angles and height. I had over complicated it in my head by a long shot. Once I sat down and just cut the first angle, the rest worked out easily.

Step 9
Making up the bases of the feet.

The legs all prepared for the next step.

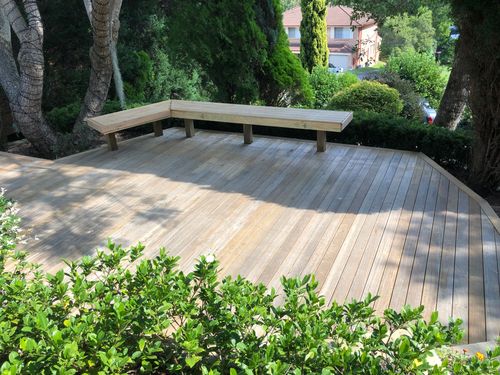
All done. The ground needs to be levelled and the table/legs/benches need to be oiled.

The best bit is it blends in to the garden nicely. You can walk past and the greyness of the table doesn't catch the eyes. If I had planed or sanded, then the red would have been bright.

Step 10
Later, I oiled the table. I had half a can of clear timber oil that I used on the underside of the table. I ran out before I could do the tabletop and the top of the seats. I used Merbau natural decking oil as I was going cheap and figured I'd use a little for the table and the rest on the patio timbers when I put them up. I'd already gone through a third of the can and that was just the first coat. The red Merbau really comes up nicely on the grey, aged timber.

Tools and materials
Materials used in the project:
- Recycled hardwood planks
- Recycled hardwood timber 50mm x 100mm
- Coach bolts 120mm x 10mm box of 25
- Washers
- Recycled 12mm bolts 180mm (recovered from old posts I had)
- Merbau natural decking oil.
Tools used in the project:

More inspiration for your outdoor furniture project
Workshop community member softwareburnout built a hardwood outdoor table after six months of research.

Community member Nham built a farmhouse-style rustic outdoor table using Pine sleepers and joined with dowels and glue.

Check out our Top 10 most popular outdoor furniture projects for more inspiration from our community members.
- Tags:
- Outdoor
Why join the Bunnings Workshop community?
Workshop is a friendly place to learn, get ideas and find inspiration for your home improvement projects